

It’s currently that time of year where we’re all getting ready for our upcoming hunts. Testing gear, keeping up with our training, and one of the more fun parts - practicing our shooting. Hopefully you’ve been getting in some time at the shooting range and really extending your effective range. And whether you’re diving hard-core into the world of long range shooting, or just trying to punch “good enough” groups at 300-500 yards, getting set up properly behind your rifle is going to be imperative.
One key (but often overlooked) component of proper shooting technique is the cheek weld. The idea is that you stabilize the front of your rifle on a pack (or a bipod if you’re fancy), get the butt of the rifle stabilized and nestled firmly in your shoulder, then bring your cheek down to rest on the stock giving you a perfect line of sight through your scope. Piece of cake, right? Well…not always. If you’re one of the vast majority of hunters out there shooting a standard production rifle with a molded stock (like I am), then the odds that your stock’s comb height, the scope height, scope diameter, necessary eye-relief, AND the shape of your face are all going to line up perfectly out of the box…well, if it does, you should probably stop and buy a lottery ticket on your way home from the range, ‘cause you’re a lucky dude.

After not terribly long in this position, my neck was killing me…not a sign of a proper shooting setup.
How do you know if it’s lining up properly or not? A couple things, really. If you’re uncomfortable behind your rifle and find yourself straining to get a clear sight picture and/or to steady your crosshairs on the target, your cheek weld might be to blame. (It could be a couple other things too, but cheek weld is worth looking at, for sure). One surefire way to know if you have an improper cheek weld is if you find your neck getting sore after a session at the range. This was my big wake-up call. I spent a morning dialing in and practicing out to 400 yards, and probably sent a total of 35 rounds downrange (with plenty of breaks walking back and forth to check/reset targets). By the end of the first box, I was noticing a serious crick in my neck while I tried to hold steady on target. When I would feel it, I’d try to relax my neck and rest my head more firmly against the rifle, but then my sight picture went in the toilet and I had to lift my head again. I realized that to have a perfect line of sight through the scope, I needed to hold my head up and barely let my cheek touch the stock. I don’t know a lot, but I know that isn’t how an official rifle instructor would advise you to set up behind the gun.
So, I turned to the internet for a solution, and found a couple of options. I could buy a new precision rifle with an adjustable cheek weld (called “comb height”)…that’s not happening. Or I could do what our own military snipers have been doing for decades and build my own cheek riser (if it worked for Ryan Phillippe in Shooter, it’s good enough for me). The best part about modifying your rifle this way is it’s completely removable, isn’t going to leave duct-tape residue all over your rifle, and you probably already have most of what you need on hand. Here’s how you do it…

This is what we’re gonna make and it’s gonna be awesome!
Gather the Necessary Supplies
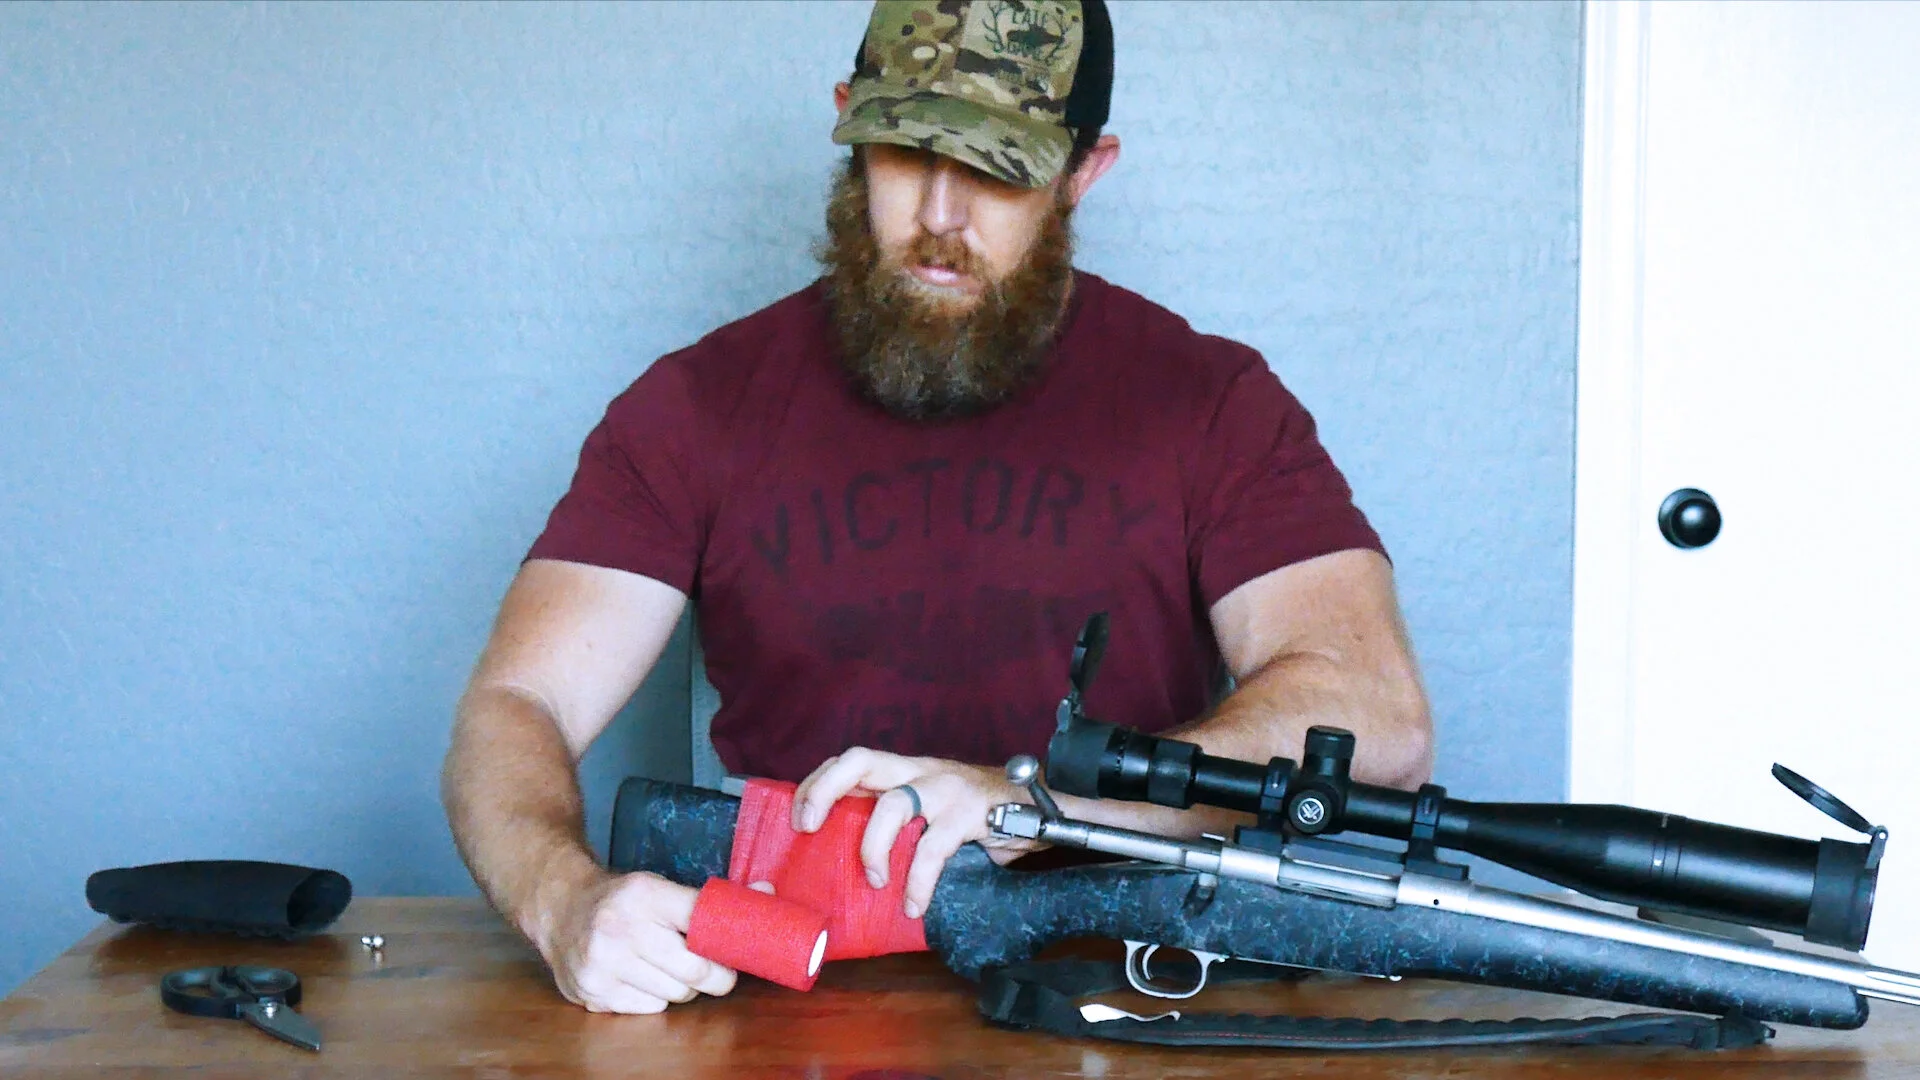
All you’ll need is:
1-2 pieces or of dense foam roughly 1”x4”.
A roll of self adhesive tape.
A piece of Moleskin.
Scissors.
For foam you can use a simple, cheap, old school sleeping pad. If you don’t want to cut an inch off the bottom of your pad (or don’t have one lying around) a couple pieces of pipe insulating foam could work, or what I had on-hand: an extra piece of interlocking gym floor material. The self-adhesive tape can be found at any drug store or even the bandage aisle of most grocery stores (it’s the stuff they wrap your arm with to put pressure on the cotton ball after they draw blood). The store I was in only had red in stock…I’m sure you could find black or some other color that will match your rifle better. And Moleskin should already be in your backcountry first-aid kit…just steal a piece from there.

A few supplies and a clean workspace…here we go!
Determine How High You Need to Build the Riser
Obvious disclaimer: make your rifle safe, remove all ammo from your workspace, and now you can get to work. With your foam cut, get set-up behind your rifle and look through the scope. Hold one piece of foam on top of the stock and rest your face firmly on it. If it still seems too low or your neck is still doing too much work, double it up and try again. I thought mine looked great with one, I tried two pieces just to experiment and it was clearly too high, so I decided one piece would be perfect for my setup.

Already looks and feels better!
Check your Placement and Start Wrapping
Before you mount the foam to your rifle, double-check you have clearance for your bolt to cycle. Actually, make sure you leave enough clearance to totally remove your bolt for cleaning, as well. Once you’ve determined how far back you need to mount your foam, hold it centered on the top of the rifle (running lengthwise), and start wrapping the tape. You’ll notice the tape sticks really well to itself, but doesn’t adhere to the stock at all. Once you get the first wrap out of the way, you’ll be able to wrap it really tight all the way around which will prevent your pad from slipping. Once you’ve thoroughly wrapped the foam, cut/tear the tape and make sure the end of the tape ends at the very top of the stock.
This tape is great stuff, and won’t leave a molecule of residue on your rifle if you ever need to remove it!
Double Check Fit and Apply Moleskin
Before you finish it off, set up behind your rifle again and make sure everything still looks and feels right. Depending on how dense your foam of choice was, the wrapping process can compress it a bit, so you just want to double check you’re still happy with the fit. If you are, take one whole piece of moleskin (should be roughly a 3”x4” rectangle, which will be about perfect for your face), and adhere it to the top of of the pad. This will cover the end of the tape, which will help prevent it from peeling up with use. The moleskin also makes for a softer and more comfortable texture to rest your face on than that sandpaper-esque tape. Yes, it will get dirty over time and need to be replaced periodically, but it won’t get slippery with sweat and won’t hurt your face…worth a little occasional maintenance, in my humble opinion.

Moleskin will be so much nicer to your face than this aggressively textured tape!
Extra Credit - Protect the Pad
Before this modification, I was already running a simple buttstock ammo carrier on my rifle. Even if I hadn’t had to use bright red tape for this one, I was going to slide the carrier back over my new cheek pad to protect it, keep the moleskin from showing all my sweat and dirt, and to generally extend the life of this modification. It’s a simple and cheap addition, plus it’s always handy to have a few extra shells at the ready. (If you don’t believe me, check out Episode 3 of the Hunting Stories Podcast)

Get Out and Shoot!
That’s it. You’ve officially sniper-fied your hunting rifle, and it only took 10 minutes and a couple bucks. All that’s left to do is get back out to the range and enjoy tighter groups, a happier neck, and the joy of being a DIY Ninja.