

For years I lived the standard gym life. Roll in on the way to work, wait for open squat racks and benches, get cleaned up and ready in the locker room (surrounded by overly confident older gentlemen), and a day or two later repeat the whole process. Don’t even get me started on what January in the gym is like…a flood of New Year’s Resolutions pour through that door and make everything I just mentioned that much harder. So, during those years I continually dreamt of a home gym, but the potential price tag kept it feeling impossibly out of reach. Plus, there’s the issue of space…if I could somehow afford the equipment, where on earth am I going to put it? (This is Phoenix, and the garage is an unbearable furnace six months out of the year)
Then one day, a glimmer of hope unexpectedly dropped in my lap. My wife and I were discussing how to repurpose an extra room in our house that just wasn’t getting a lot of use, and I brought up the idea of a home gym. Because my wife is the greatest human on the planet, she agreed that sounded like a great idea. So, I immediately began researching and shopping, and what I discovered was that a highly effective home gym is well within reach for the average budget. In fact, the basics can cost little more than a year’s worth of gym dues (which, by the way, you won’t be paying anymore).
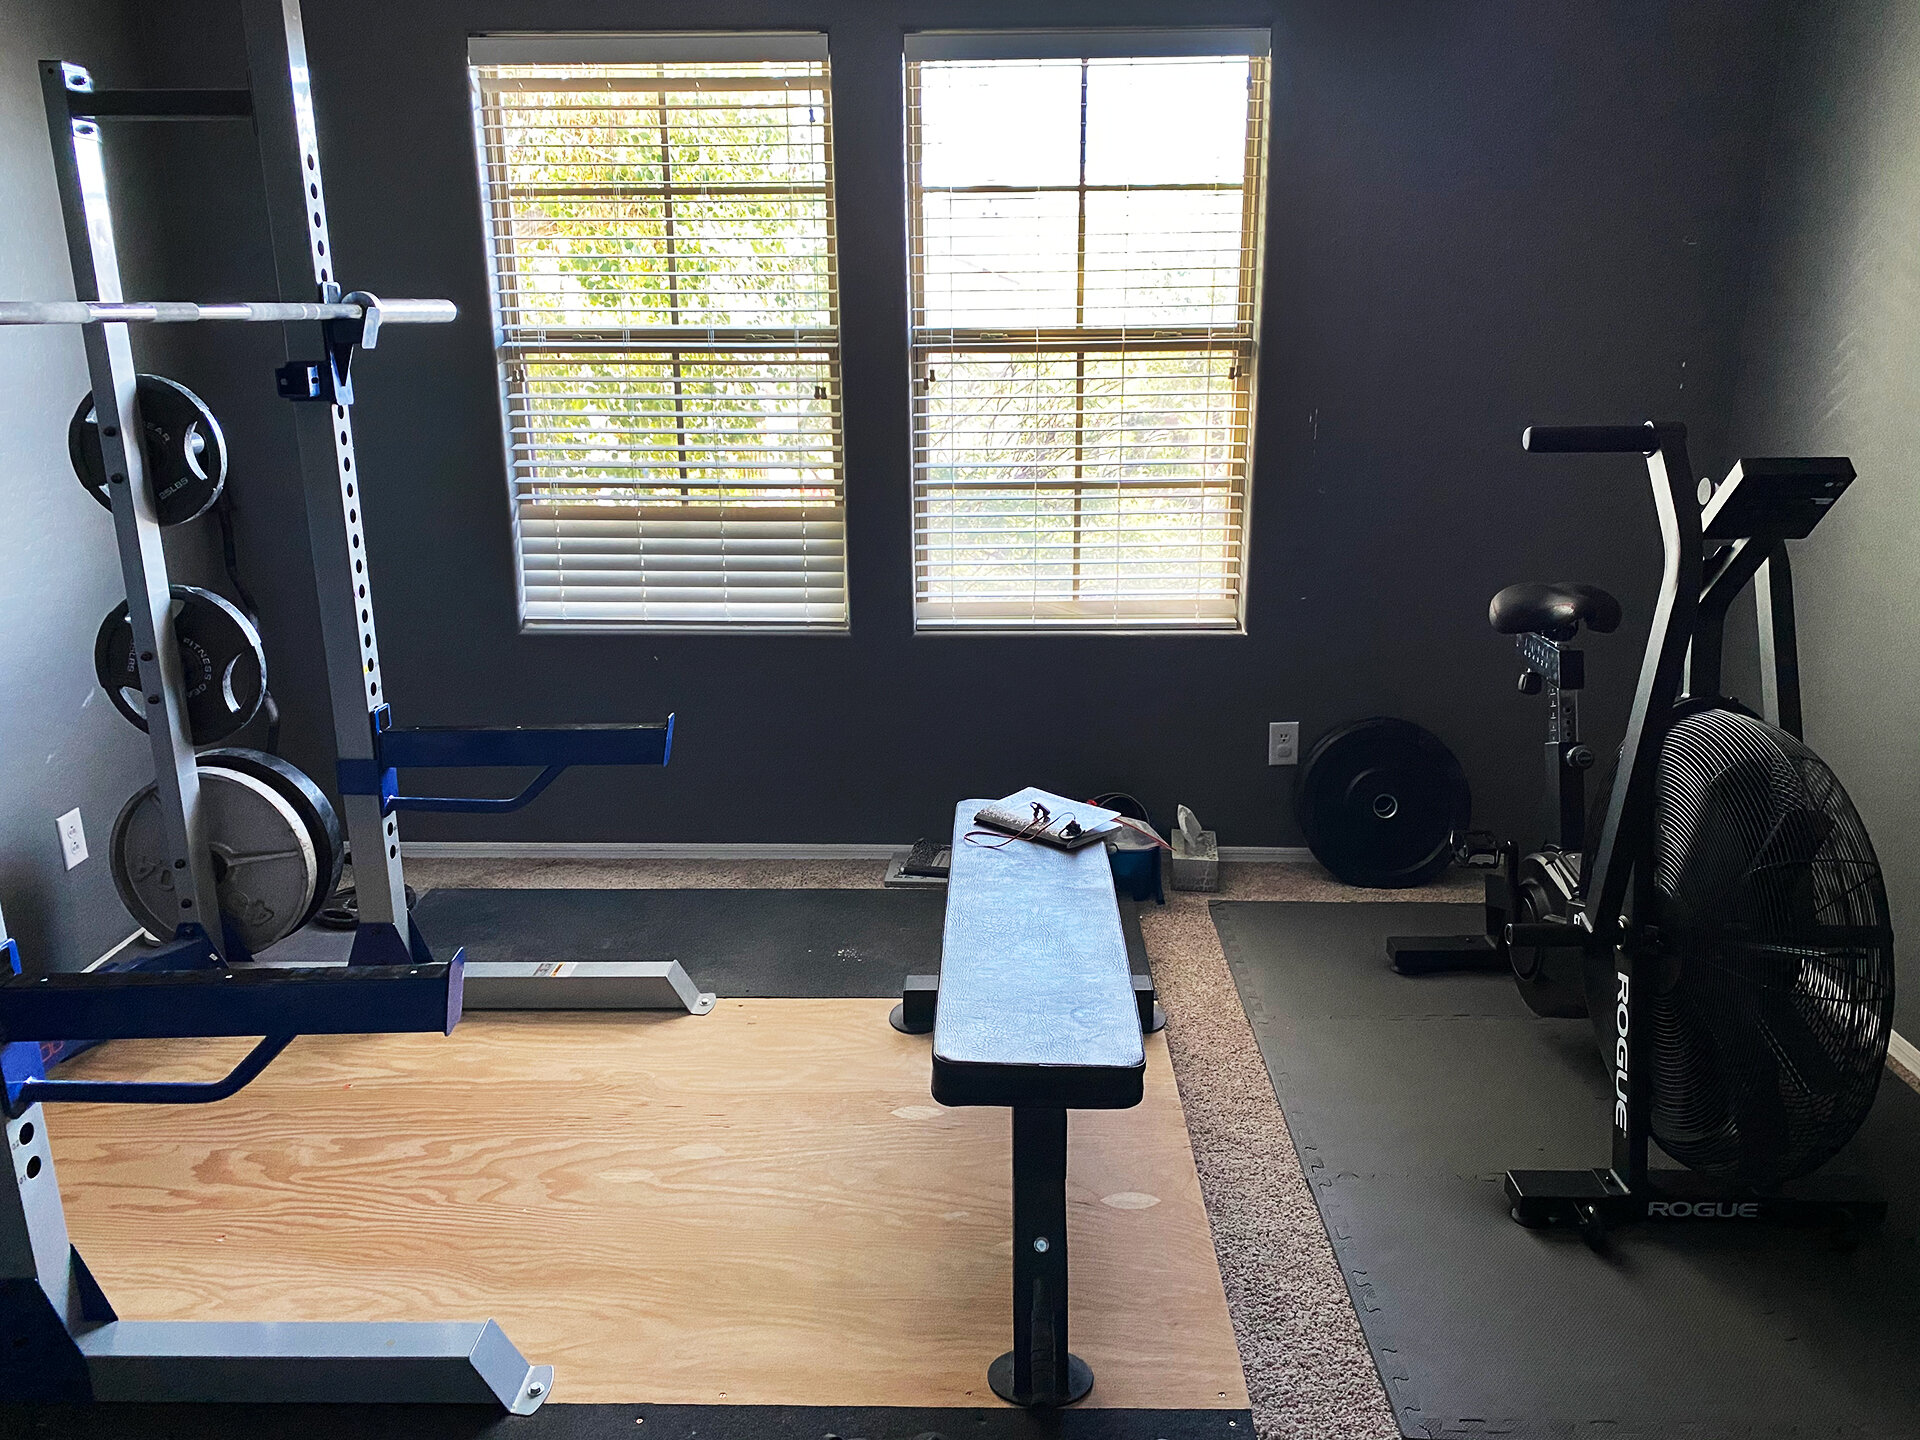
It only takes up half of a spare bedroom, but it has virtually everything I need to train for the mountains!
So, if you’ve ever dreamt of leaving the globo-gym and working out in the comfort and privacy of your own home, here’s how to do it…
If you’d rather watch the video breakdown of how to build this thing, check it out here.
What do you actually need?
I would love to give everyone the exact same recommendation for what gear you need, but I realize not everyone looks at fitness the same way I do. Personally, I think at least 90% of the population could get everything they need from a basic barbell setup and a way to incorporate cardio/endurance training. I know a lot of people have become much more comfortable on a vast assortment of machines, and have been led to believe that an ever-evolving program of muscle confusion is the only way to results. Let’s face it, this article is probably not going to talk you out of that. The point is that you should consider how you like to (or plan to) train, and what equipment you’ll need to make that possible.
Frankly, there’s very little you can’t accomplish with barbells. Whatever a machine does, a barbell can do it (probably better). It might not isolate a particular obscure muscle as well, but you can thoroughly strengthen all the regions of your body with basic barbell lifts. The advantage for the home gym builder is that a barbell setup will take up less square-footage and cost less than trying to pack an assortment of multi-purpose machines into your gym space.
That being said, what you need for this endeavor is: a rack, a barbell, plates, and a bench. That’s really it! And the beauty of that short list is that you can always find those items on the used market. Spring is actually a killer time to pick up those gently used pieces of equipment as people have waved goodbye to the resolutions that led them to buy the gear in the first place, and are currently in the middle of Spring cleaning. They’d happily let you walk away with their equipment for less than half of what they paid for it a dozen uses ago just to clear the space in their garage for a new ping pong table.

I picked up most of this setup from a distance runner that thought he wanted to build up strength, used it a dozen or so times, and a year later decided he’d rather have the space in his garage.
Obviously, you want to make sure the gear is safe…when I was shopping around, I always dismissed the racks and bars that had been living in someone’s backyard and were rusted out. Be patient, keep looking, and eventually you’ll find that gem you’re looking for. Whether you find one guy with everything you need, or have to make 4-5 separate transactions, you’ll still save hundreds (maybe over a grand) scouring the used marketplace to acquire what you need.
Where should you put it (can it go upstairs)?
Space is the other key issue that’s going to be a barrier for a lot of us, and some living situations or seasons of life may just not be possible to rock the home gym lifestyle…and that’s okay. Keep it as a goal and the next time you’re looking to move or a kid is finally moving out of the house, maybe that’s the time to pull the trigger and realize your home gym dreams. The problem for most of us is that gym equipment isn’t a great aesthetic (at least according to most wive’s decorating sensibilities). I am married to the greatest woman in the world, but even she wasn’t about to have the first thing people see when they enter our home be a big squat rack with my sweaty lifting belt lying next to it in our front room.
For this reason, the garage, back porch, or spare room seem to be the most common solutions. You can rock the garage if you want, and there are a handful of cooling options you can use during the summer months (evaporative cooler, wall-mounted AC, big-ol’ fan, etc.). This will create issues if you’re used to parking your cars in the garage, but maybe that’s a sacrifice you’re willing to make. Personally, aside from the heat issues here in the desert, I do a lot of woodworking in my garage and I didn’t want a perpetual layer of sawdust flying all over my gym equipment.
If you want the climate-controlled goodness of an indoor gym, you’re now talking about a spare room (or at least some spare space somewhere out of sight enough to keep everyone happy). This leads to one of the most common questions: can you build a home gym upstairs? Disclaimer: I am not a licensed contractor, architect, or anyone else with official training in home construction…just a guy who LOVES research. That being said, YES, you can absolutely build an effective gym upstairs in your house.
Here’s why and how…WHY? Building codes state that the joists of a second floor must be rated to hold 30-40 lbs. per sq/ft (30 for bedrooms, 40 for common areas). Obviously, that strength gets distributed across multiple joists with the subfloor, which is why a 200lb. man can stand in one square foot and not come crashing through the ceiling below. But, knowing those figures, you can now plan a safe lifting setup on your second story.
HOW? This is where the lifting platform comes in. Using multiple layers of plywood, I not only made a comfortable and awesome place to lift, but created a way to distribute the weight of myself and the bar/plates over a larger area. The whole rack, all the plates, and me while I’m under them sits on an 8’x8’ platform. Basic math says that this is 64 sq/ft., which when multiplied by the floor’s 30 lbs. per sq/ft. requirements means that lifting platform can hold 1,920 lbs. There is no universe where my 211 lb. self is standing on that platform holding over 1,700 lbs…so this platform will meet my needs forever! I know those were a lot of numbers, but I think you get the point.
Two quick notes: 1) placing the platform as close to the exterior of the home as possible puts you in the strongest point on those floor joists (provided your layout can allow for that). 2) I wouldn’t put your gym upstairs if you do a lot of olympic-style lifting where you’ll be dropping the weight. I love really heavy deadlifts, but I always set the weight back down. If you love throwing up a PR snatch and letting it crash back down to the floor, your family downstairs (and probably your ceiling drywall) would appreciate you not doing that.

Not only does this distribute weight for the safety of the house (and myself), there is no surface I’ve found that feels better to squat heavy on than a solid wood base!
I could get into all the details about how exactly I constructed the platform, but I stole the plans from one of my favorite websites, The Art of Manliness. So, if you’re curious, you can just check out that article here.
Where to SAVE and where to SPEND the money?
I am by nature a frugal person. I love getting a deal, and hate paying full retail price for just about anything. However, I’ve learned over the years that this impulse isn’t always a good thing. Plenty of times I’ve gone with a cheaper option to save a few bucks, only to end up upgrading that item not too far down the road. So, in some cases, I ascribe to the “buy once, cry once” philosophy…when it really matters, it’s better to just spend a little bit extra to get what you really want/need.
When it comes to gym equipment, however, I think a majority of it could be picked up on the cheap.
The Rack: Save your money! If you’re already looking on the used market, you’ll be seeing tons of deals anyway. Obviously, it needs to be safe, so if it’s been sitting out in the weather or a shop-class welding student built it himself…maybe pass. But, if it’s been gently used and is rated for more weight than you ever plan to rack on it, you should be good to go. (Incidentally, a little research will typically allow you to find the used item you’re looking at where it’s being sold new, which should give you all the stats on its weight rating)
The Plates: Save even more money! These are little more than fancy stones we’ve manufactured in consistent weights and diameters…it doesn’t need to look pretty. If they don’t match…cool. If they’re kinda beat up…even better. Even if they’re off of their printed weight by a pound or two, no big deal! You’re not running an olympic event out of your home gym, and so if what should be a 400 pound lift is actually 397.5…okay. If you’re the type of person that would be bothered by that, weigh each of your mismatched used plates and write their true weight in sharpie. Especially if you’re building a platform with rubber mats to set the weights on, you don’t even need to worry about bumper plates.
The Bar: This is the one area I would tell you to SPEND THE MONEY. This is the thing that will be in your hand or across your back for every training session, and it’s the piece taking the most stress and abuse. If you plan to be putting up any sort of strength numbers north of 300 lbs., you’re going to need something better than a bargain-basement-made-in-China barbell. Spend a minute googling “broken barbell” and you’ll see real quickly why you don’t want to risk a bar failing or snapping while you’re holding it. I’m not endorsed by them in any way, but Rogue is absolutely the industry standard in the barbell world.

This was the exact bar I really wanted, but wasn’t going to be able to justify spending $300 on…lucky me, they had a “Boneyard” version that was just under $200 and flawless as far as I can tell!
The Bench: You don’t have to go nuts on this one, but consider its weight-rating very carefully before buying it. There are a million companies churning out cheap bench pressing systems, and you’ll often find guys selling them on OfferUp (or similar marketplaces). All of them seem to cap off at a 250-300 lb. weight capacity. That sounds fine when you’re just thinking about your body weight, but you won’t be lying on that thing with only your body weight. Can you imagine what could happen if you lie down on that with your body weight and then unrack a bar with over 200 lbs. on it? If that bench fails while that weight is suspended above your face and throat, it’s gonna be a really bad day. All that to say, search really hard. You can still find great, sturdy benches rated for hundreds of pounds on the used market…it just may take more looking than some of the other components. And if you can’t find the weight rating for a particular bench you’re looking at, I’d play it safe and pass.
The bottom line…how much?
Okay, I’ve thrown a lot at you in terms of numbers and stats. If you’re looking for how much it’s going to cost you, here’s what I spent. Obviously, there will be some variation since we’re dealing a lot with an unpredictable used market, but this should be in the ballpark.
Squat rack w/ cheap bar and 300 lbs. of weight: $300
Upgraded Rogue Bar: $200 (check their Boneyard…fully functional “scratch-and-dent” bars at a steep discount. Incidentally, I turned around and sold the cheap bar that came with my rack for $40, putting me further ahead on the budget.)
Additional Plates: $340 (Typically a little over 50-cents per pound for steel…a pair of 45’s for about $40-50 is a good deal. I also bought some new off-brand bumper plates in 25s and 45s ‘cause my wife was starting to lift as well, and those two pairs totaled $300…you can do closer to $1/lb. on the used market, but I got impatient)
Lifting Platform: $175 (Use 1/2” MDF for the two base layers and 3/4” ply for the top layer. Then grab one horse stall mat from your local tractor supply/feed shop)
ALL-IN: $1,015 - $40 from barbell sale = $975
But what about…

While it’s not a necessary addition to your home gym, I absolutely love (and hate) this thing! I always find reasons to avoid running, and this little wonder leaves me with no excuses.
Okay, obviously the picture of my gym included a Rogue Echo Bike that I never mentioned (and would nearly double that sub-$1,000 figure above). Here’s why I didn’t mention it…For one thing, it was a gift. I realize most of us can’t count on such an awesome and extravagant gift, but technically I didn’t buy it. But, the real reason I didn’t include it is that it isn’t totally necessary for an effective home gym. Yes, cardio/endurance training should be a regular part of our fitness plans, but there are a ton of free ways to do that training. Go for a jog, hike with a weighted pack (or even just walk around your neighborhood), burpees, stair climbs, bleacher runs…I could go on, but the truth is that there are plenty of ways to train for endurance without adding more equipment to your gym and your budget.
So, if you’re ready to finally quit the gym once and for all: clear out some space, set aside a little money, and start scanning the used marketplace. In almost no time at all, you can have a fully functional home gym and kick the headaches of the globo-gym to the curb!